Exploring FBackup: A Reliable and User-Friendly Backup Solution


Introduction

In a digital age where data is paramount, having a trustworthy and efficient backup solution is essential. FBackup, a powerful backup software, has gained recognition for its user-friendly interface and robust features. In this article, we will delve into the key aspects of FBackup, exploring its features, benefits, and how it serves as a reliable guardian for your valuable data.

Overview of FBackup

FBackup is a free backup software developed by Softland, known for its simplicity and effectiveness. It caters to a broad audience, from individual users seeking basic backup capabilities to businesses requiring more advanced features. FBackup is designed to create and manage backups seamlessly, ensuring the safety and accessibility of your critical data.

FBackup Key Features

1. User-Friendly Interface
 FBackup is renowned for its intuitive and easy-to-use interface, making it accessible to both beginners and experienced users. The straightforward design allows users to set up and manage backups without a steep learning curve.

2. Backup Types
FBackup supports different backup types, including full, mirror, and incremental backups. Users have the flexibility to choose the most suitable method based on their preferences and storage requirements.

3. Automatic Backup Scheduling
 The software offers the convenience of automatic backups, allowing users to schedule recurring backups at specified intervals. This feature ensures that your data is consistently protected without manual intervention.
 

4. Multiple Backup Sources
 FBackup enables users to back up a variety of sources, including local drives, external USB drives, network drives, and even cloud storage solutions. This versatility ensures that users can choose the storage option that best suits their needs.

 5. Zip Compression
 To optimize storage space, FBackup employs Zip compression, reducing the size of backup files without compromising data integrity. This is particularly beneficial for users with limited storage capacity.
 

6.  Email Notifications
 FBackup can be configured to send email notifications upon the completion of backup tasks. This feature keeps users informed about the status of their backups, providing peace of mind.

Ease of Use

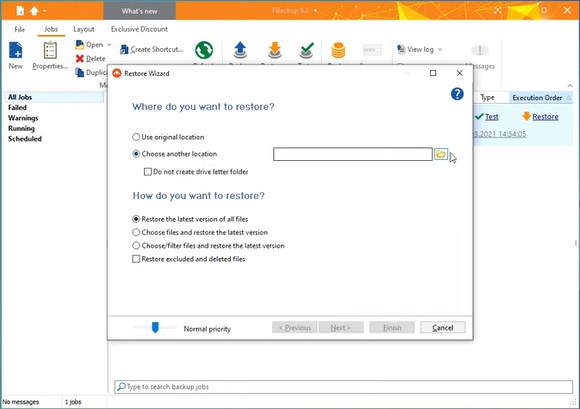
One of the standout features of FBackup is its emphasis on simplicity. The software's user-friendly design streamlines the backup process, allowing users to create and manage backups effortlessly. The step-by-step wizard guides users through the setup, making it accessible even for those new to backup solutions.


Versatility and Compatibility

FBackup supports a wide range of Windows operating systems, ensuring compatibility for a broad user base. Additionally, the software's flexibility in handling various backup sources makes it a versatile tool for both personal and professional use.

Limitations of the Free Version

While FBackup offers robust features in its free version, users looking for advanced functionalities, such as backup plugins and encryption, may need to consider the paid version, Backup4all, which extends the capabilities of FBackup.

Conclusion

FBackup has emerged as a reliable and user-friendly backup solution, catering to the diverse needs of individuals and businesses alike. Its straightforward interface, automatic scheduling, and support for various backup types make it a valuable asset in the realm of data protection. Whether you're safeguarding personal files or securing critical business data, FBackup stands out as an efficient and accessible tool to ensure the integrity and availability of your digital assets.

How To Install Duplicati On Ubuntu 22.04

How to install Duplicati on Ubuntu


In this short article we will learn about Duplicati and how to install it on Ubuntu 22.04 LTS Operating systm.

Introduction

Duplicati is a powerful, open-source backup solution designed to safeguard your data by creating secure and efficient backups. In this article, we will delve into what Duplicati is, its key features, and a step-by-step guide on how to install and set it up for your data protection needs.

What is Duplicati?

Duplicati is a free, open-source backup software that enables users to back up their data to various destinations, including cloud services like Google Drive, Dropbox, and others, as well as local storage. It supports a variety of platforms, including Windows, macOS, and Linux, making it a versatile solution for users with different operating systems.

Key Features of Duplicati

1. Encryption. Duplicati prioritizes the security of your data by encrypting it before transmission and storage. This ensures that your sensitive information remains private and protected.
2. Flexible Backup Scheduling. Users can set up automated backup schedules, allowing for regular and hassle-free data backups. This ensures that your data is consistently protected without requiring constant manual intervention.
3. Incremental Backups Duplicati employs an incremental backup strategy, meaning that only the changes made since the last backup are stored. This not only saves storage space but also reduces the time and resources required for each backup.
4. Multiple Storage Options Duplicati supports a wide range of storage options, including popular cloud services such as Amazon S3, Microsoft Azure, and others. Users can choose the storage solution that best fits their needs and preferences.

Installing Duplicati On Ubuntu 22.04 LTS

In this section we will install Duplicati on Ubuntu 22.04. There are several steps to be take to install Duplicati on Ubuntu 22.04 LTS operating system. Here is the Duplicati installation guide.

1.  Add the Duplicati repository to your system:

$ sudo add-apt-repository ppa:duplicati/ppa


2. Update the package list:

$ sudo apt-get update

3. Install Duplicati:

$ sudo apt-get install duplicati

4. Start the Duplicati service:

$ sudo systemctl start duplicati


Configuring Duplicati:

1. Open your web browser and go to http://localhost:8200.
2. Follow the setup wizard to configure your backup destination, encryption settings, and schedule.
3. Add the folders you want to back up.
4. Save the configuration and run your first backup.

Conclusion


Duplicati is a robust solution for users seeking a flexible, secure, and open-source backup tool. By following the installation and configuration steps outlined in this guide, you can ensure that your data is backed up regularly and securely, providing peace of mind in the face of potential data loss scenarios.


Clonezilla Short Review and Installation Guide for Ubuntu


How to install Clonezilla on Ubuntu
In this short article we will make a short review about Clonezilla and how to install it on Ubuntu 22.404 operating system.

Introduction

In the ever-evolving landscape of data management and system administration, the importance of reliable disk imaging and cloning tools cannot be overstated. Clonezilla, an open-source disk cloning and imaging solution, has established itself as a versatile and powerful tool for both personal and professional use. This review delves into the key features of Clonezilla and provides a step-by-step guide on how to install it on an Ubuntu system.

Key Features of Clonezilla

1. Disk Cloning and Imaging
Clonezilla excels in creating exact copies of disks or partitions, ensuring a seamless backup and recovery process. Whether you need to replicate an entire system or just specific partitions, Clonezilla offers the flexibility to meet diverse cloning needs.

2. Versatility in Storage Options
Clonezilla supports a variety of storage destinations, including local disks, network-attached storage (NAS), and external USB drives. This versatility allows users to choose the storage solution that aligns with their requirements and infrastructure.

3. Filesystem Support
Clonezilla is filesystem-agnostic, supporting a wide range of file systems such as ext, NTFS, FAT, and more. This makes it compatible with various operating systems and ensures that users can clone and restore data without compatibility issues.

4. Live System Imaging
The ability to perform cloning operations on a live system without disrupting normal operations is a standout feature of Clonezilla. This ensures minimal downtime during backup and recovery processes.

5. Disk-to-Disk and Disk-to-Image Operations
Clonezilla allows users to perform both disk-to-disk cloning and disk-to-image operations. Disk-to-disk cloning creates an identical copy on another disk, while disk-to-image saves the disk or partition as an image file for later restoration.

6. Support for Multiple File Formats
Clonezilla supports various image file formats, including Clonezilla's native format, gzip, and Partclone. This flexibility enables users to choose the compression and storage format that best suits their needs.

How To Install Clonezilla On Ubuntu 22.04

There are several steps to be take to install Clonezilla on Ubuntu 22.04 LTS operating system.Here is the Clonezilla insallation guide.

Step 1: Update System Packages

$ sudo apt update
$ sudo apt upgrade


Step 2: Install Clonezilla

$ sudo apt install clonezilla

Step 3: Launch Clonezilla

$ sudo clonezilla

Step 4: Choose the Desired Mode

Clonezilla provides two modes: device-image (for disk-to-image operations) and device-device (for disk-to-disk operations). Select the appropriate mode based on your requirements.
 

Step 5: Follow the On-screen Instructions

Clonezilla's user-friendly interface guides you through the cloning process. Follow the on-screen instructions to select source and destination disks or partitions, configure options, and initiate the cloning process.

Conclusion

Clonezilla stands as a robust and user-friendly solution for disk cloning and imaging, catering to the diverse needs of users ranging from individual enthusiasts to system administrators. Its versatility, compatibility with various filesystems, and support for different storage options make it an invaluable tool in the realm of data management and system maintenance. By following the straightforward installation process on Ubuntu, users can harness the power of Clonezilla to ensure data integrity, streamline backup processes, and facilitate efficient system recovery when needed.

For more information about Clonezilla can be found at Clonezilla official website.

Box Backup Short Explanation And Installation Guide


 In this short tutorial we will learn about Box Backup and how to install it on Ubuntu 22.04 LTS operating system.

Introduction

Box Backup is an open-source, automatic, and secure backup solution that combines the best of both worlds – simplicity and robust data protection. Developed with a focus on ensuring data security through encryption and efficient storage management, Box Backup has gained popularity as a dependable choice for businesses and individuals alike.

In the realm of data backup solutions, Box Backup shines as a reliable, open-source alternative that prioritizes security and simplicity. This article explores the key features of Box Backup and provides a step-by-step guide on how to install it on an Ubuntu system.
Unveiling Box Backup.

Box Backup Key Features

1. Automatic Backups
Box Backup takes the hassle out of data protection with its automatic backup capabilities. Once configured, it seamlessly performs backups without the need for constant manual intervention.

2. Client-Side Encryption
Security is at the forefront of Box Backup. It employs client-side encryption, ensuring that data is encrypted on the client system before transmission, providing an additional layer of protection.

3. Efficient Storage Management
Box Backup optimizes storage usage by keeping track of file changes. It employs a snapshot-based approach, ensuring that only the modified parts of files are backed up, reducing storage requirements.

4. Support for Cloud and Local Storage
Box Backup offers flexibility by supporting both cloud and local storage options. Users can choose the storage solution that best suits their needs, whether it be on-site servers or popular cloud platforms.

5. Cross-Platform Compatibility
Box Backup supports a variety of operating systems, including Linux, macOS, and Windows. This cross-platform compatibility makes it a versatile solution for diverse IT environments.

How To Install Box Backup on Ubuntu 22.04

Step 1: Update System Packages

$ sudo apt update
$ sudo apt upgrade


Step 2: Install Box Backup

$ sudo apt install boxbackup

Step 3: Configure Box Backup
During installation, you will be prompted to configure Box Backup. Provide the necessary information such as encryption keys, storage locations, and other preferences.

Step 4: Start Box Backup Services

$ sudo systemctl start boxbackup-server
$ sudo systemctl start boxbackup-bbackupd


Step 5: Enable Box Backup Services to Start on Boot

$ sudo systemctl enable boxbackup-server
$ sudo systemctl enable boxbackup-bbackupd

Conclusion

Box Backup stands out in the crowded landscape of backup solutions, offering a compelling combination of security, efficiency, and flexibility. By choosing Box Backup, users can entrust their data to a reliable open-source platform that simplifies the backup process without compromising on the crucial aspect of data security. Whether for personal use or within an enterprise setting, Box Backup is a valuable asset in the pursuit of resilient and secure data protection.

For more information about Box Backup can be found at Box Backup official website.

How To Install Bareos On Ubuntu 22.04 LTS


In this short article we will learn how to install Bareos, an open-source backup software forked from the well-known Bacula project.

Introduction

In the ever-expanding digital landscape, the need for reliable and efficient data backup solutions is more critical than ever. Bareos, an open-source backup software, has emerged as a powerful alternative, providing businesses with a flexible and scalable platform for safeguarding their valuable data. This article explores the key features of Bareos and outlines the steps to install it on an Ubuntu 22.04 system.

What is Bareos?

Bareos, derived from the Bacula project, is an open-source backup and recovery software designed for enterprise-level data protection. It inherits the strengths of its predecessor while introducing new features and enhancements. With a modular architecture and support for a variety of storage solutions, Bareos caters to the diverse backup needs of modern businesses.

Bareos Key Features

1. Modular Architecture
Bareos follows a modular design, comprising components like the Director, Storage Daemon, and File Daemon. This modular approach enhances flexibility, allowing users to customize the backup system to meet their specific requirements.

2. Cross-Platform Compatibility
Similar to its predecessor Bacula, Bareos supports a wide range of operating systems, including Linux, Windows, and macOS. This cross-platform compatibility ensures seamless integration into diverse IT environments.

3. Scalability
Bareos is designed to scale with the growing needs of an organization. Whether you have a small business or an extensive enterprise setup, Bareos can adapt to varying data sizes and complexities.

4. Storage Backends
Bareos supports various storage backends, including disk, tape, and cloud storage. This flexibility enables organizations to choose storage solutions that align with their budget and performance requirements.

5. Encryption and Compression
Security is a top priority in Bareos. It provides built-in data encryption and compression, ensuring that sensitive information is protected during both transmission and storage.

6. Job Scheduling and Prioritization
Bareos includes advanced job scheduling mechanisms, allowing administrators to prioritize backups based on the criticality of data. This ensures that essential information is backed up promptly.

Installing Bareos on Ubuntu 22.04

Step 1: Update System Packages

$ sudo apt update
$ sudo apt upgrade


Step 2: Install Bareos Components

$ sudo apt install bareos bareos-database-sqlite3 bareos-filedaemon bareos-webui

Step 3: Configure Bareos

During installation, you will be prompted to configure Bareos. Choose the appropriate options based on your setup.

Step 4: Start Bareos Services

$ sudo systemctl start bareos-dir
$ sudo systemctl start bareos-sd
$ sudo systemctl start bareos-fd


Step 5: Enable Bareos Services to Start on Boot

$ sudo systemctl enable bareos-dir
$ sudo systemctl enable bareos-sd
$ sudo systemctl enable bareos-fd

Conclusion

Bareos stands as a testament to the capabilities of open-source software in providing robust data protection solutions. With its modular architecture, cross-platform compatibility, and scalability, Bareos caters to the diverse needs of enterprises navigating the complex landscape of data management. By embracing Bareos, businesses can fortify their data protection strategies, ensuring the resilience and availability of critical information in an ever-evolving digital world.


Back To Top